When to use Quick Sends, Campaigns and Funnels

27. October 2015

Once you have created customized emails and added contacts to your Voodoo account, your next step is to start sending campaigns.  Voodoo Business Builder accounts offer a choice of how to send campaigns.  In this QuickTip we will review which ones are best for the scenarios you face.  

Voodoo QuickTip #173 - When to use Quick Sends, Campaigns and Funnels

Quick Send Quick Send: This is a great tool to reach new contacts and build your contact lists every day. Use this when you want to reach out quickly to one person or a small group and you want to add them to a Contact List at the same time. 

Send Email Send Email: Lets you send a single-stage personalized campaign (email template) to any group with a few simple clicks. You can choose automated notifications for when your emails get opened and videos are viewed, plus auto-response emails to follow-up for you.  From the Send Email page, you can also launch the Campaign Wizard to be guided step-by-step through the process.

For more detailed information, download and read our How to Voodoo Guide.


Funnels & Forms Funnels & Forms: Here's where you'll find the real magic of Voodoo for automated and multi-stage outreach. This area is full of features for power users, allowing you to create drip marketing campaigns, capture forms and automated triggers.

For more information on Funnels and Forms be sure to check out Forms and Funnels and Success Automation 101.


You can configure each feature to meet your needs in many ways.  Here are some examples of how to use each type of campaign: 

  • To send a one-off email (to one or two people) that you just met at a networking event, use Quick Send
  • To send a one-time campaign like an end of the month promotion (to one contact list, one time), use Send Campaign (once and done).
  • To send a recurring campaign that reminds customers to register for an event using the same email template, use Send Email with Auto-Scheduler (same email template/sent at certain intervals). The auto scheduler will look for the assigned list and new contacts added since the last send will get the next email. 
  • To run a perpetual campaign (where you add new contacts to the list over time) you should set up a Funnel and set wait time to “0” - knowing that anytime a contact is added they will get the email (this is a “once and done” option). 
  • To send recurring messages like expiration notices, set up a Funnel and configure the funnel set-up to trigger off of expiration dates or any dated custom field (not wait time or calendar dates). 


Business Builder users: consider how you want to use these features in your account. You can use available PowerPack time for us to help you with setup.  eVideo Launcher users: let us know if you're considering an upgrade to the full-featured version of Voodoo so you can have access to these advanced features (and much more). It's all about saving time and making you more successful.

Build Campaigns, Business Builder, eVideo Launcher, Quick Add & Send, Quick Tip, Sales Funnels & Auto Scheduler

Turbo-charge Your Marketing with Contact Forms

9. June 2015

Using a Voodoo Contact Form (a/k/a “Capture Form”) let you capture leads that populate directly into a Funnel Contact List. This lets you automate your marketing process, save time and be far more effective with prospect nurturing. 

Just set up one or more Funnel Emails. Each contact added to the Funnel List will receive the emails you choose on whatever schedule you choose!


Contact Form

This QuickTip explains how (and why) to bookmark and/or create shortcuts to your Contact Forms so you access your forms instantly, both in and out of the office.  

Voodoo QuickTip #652 - Easy Access to Contact Forms

Every Funnel has the ability to have a Contact Form that feeds contacts directly into a funnel for drip marketing and nurturing. 

Contact Form lets salespeople tool add contacts to specific funnel lists quickly and on the go…from any web-enabled device. No need to log into Voodoo to add new contacts to a list. Just open a bookmarked Contact Form, fill out the fields and Submit.

Business Builder Users: Here's how to create a contact form for your funnel.

1.  Go to Funnels & Forms


Funnels & Forms

2.  Click on the Funnel (or create a new one)

3.  Click on the Contact Form tab for details on the Contact Form
 

Contact Form

Once you set up your Contact Form (don't forget to Enable it and Save), copy the Contact Form URL.  This is the absolute URL (web) address to access the Capture Form associated with this specific funnel.

For your desktop computer, visit the page and bookmark it in your web browser or create a home screen shortcut.  For your mobile devices, creating a home screen shortcut is usually the easiest way to access the Contact Form. 

Some clarification:
Bookmark is a saved link to a web page that has been added to a list of saved links. 
Shortcut is a link to an item (file, folder, program or web page) on your computer desktop or mobile device home screen. 

Here's a list of instructions on how to create a bookmark or shortcut for some common web browsers and devices: 

Business Builder users, give it a try right now by logging into your Voodoo account.  And eVideo Launcher users, well, you can probably guess what I'm going to say... Contact Forms are yet another reason to upgrade to the full-featured version of Voodoo.

Business Builder, Quick Tip, Sales Funnels & Auto Scheduler, Contact Forms ,

Using Voodoo Sales Funnels for Event Invitations & Registrations

6. June 2014

Events can be a great way to generate and nurture leads for your business.  A number of elements that go into setting up online registration for an event, as well as promotions to attract people to register. Voodoo lets you manage your events painlessly.

Let’s say you have a multi-city roadshow and you’re responsible for the whole shebang. Voodoo handles it all with ease and eliminates unnecessary calls and emails to your event staff in each location.

  • Set up separate invitations and registrations for each city with simultaneous centralized and local registration management.
  • Set up local events to send real-time notifications to whomever you need—so Denver’s conference center knows to expect 332 attendees, and Dallas' caterer is ready to serve 210.
  • Automated reminders keep people pumped up and ensure maximum attendance.    


After the event, using capture forms, list automation, and message templates, you’ll reach out with unique content tailored precisely to those who attended and those who didn’t.

Voodoo is a great tool to use for any events, for both the registration process and the pre-event promotion. There are many different ways to utilize Voodoo for your events, and this post will walk you through a set up for the most common and simplified way. 

Keep in mind once you set up one event in Voodoo, you can easily make a copy of everything for your next event.
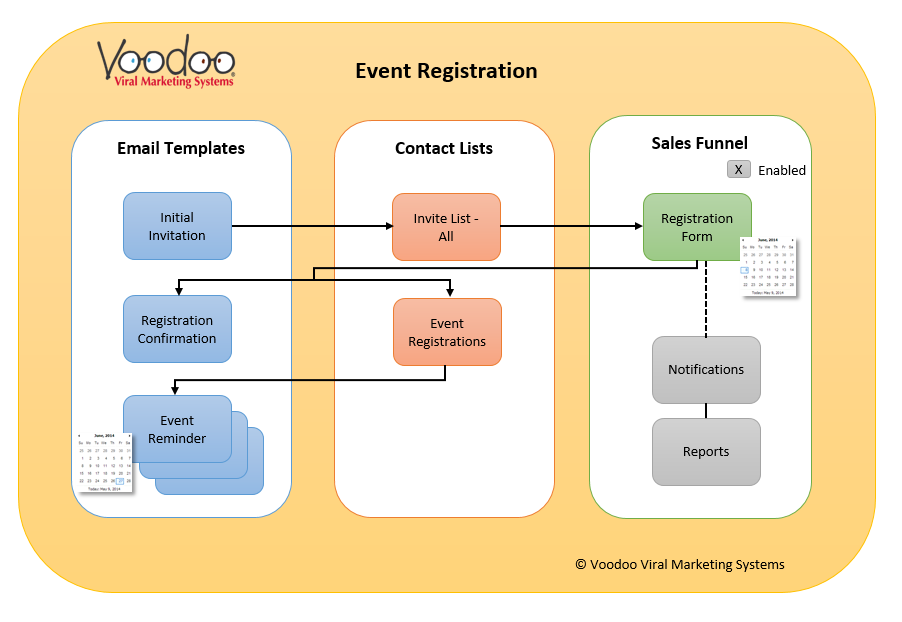
1) Create your Email Templates:

Initial Invitation Email - the email that will go out to the list of all contacts you invite to your event

Registration Confirmation - the email that will be sent automatically after a contact registers for the event

Reminder of Event - a reminder automatically sent to contacts that have registered for the event, reminding them of the event, and including all the pertinent details

2)  Create Contact Lists:

Contact List for the Initial Invitation - everyone who should receive the invitation email

Create an Empty Contact List to collect the Event Registrations in your Sales Funnel - for those who fill out the registration form, and who will receive the confirmation email and reminder. See Step 3.  

3)  Create a Sales Funnel:

The Sales Funnel is what you will use to build your registration (contact) form, and schedule your confirmation and reminder emails.  Be sure to enable the funnel by clicking the Enable box.  


Attach the Registration Contact List to the Funnel Any contacts who fill out the registration form will be added to this contact list.
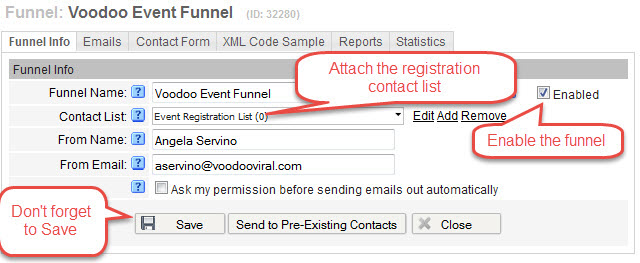

Create your Contact form in the Sales Funnel on the Contact Form tab.  Be sure to Enable it by checking the box. Add your content using the Page Header, Form Header, Page Footer and Confirmation Page. Also here is where you select what form fields you want to include on the form. Be sure to Save.

Also copy the URL, so you can paste it into your Inititial Invitation Email (it will link to the registration form).
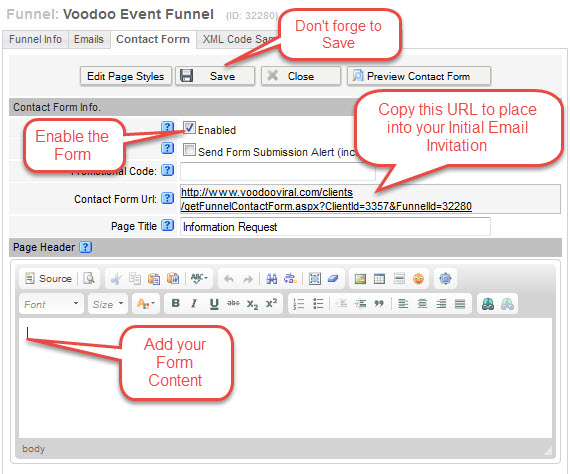
Add Your Confirmation Email Template and Reminder Email Template to the Sales Funnel. 
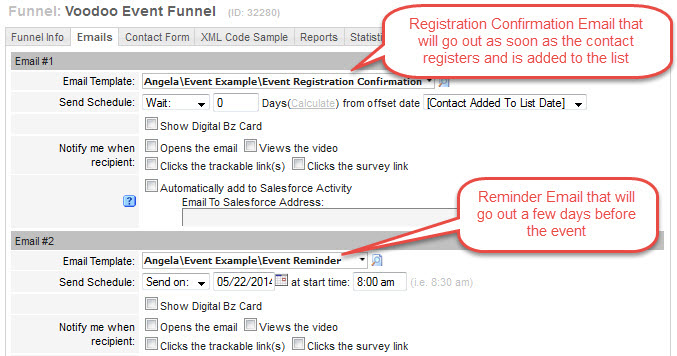
Don't forget to hit Save.  Once your funnel is set up and enabled, be sure to fully test all components before you send your Initial Invitation email.

Also, once you have set up a Sales Funnel for an event, you can easily copy an entire funnel to use as a template for your next event. 


One thing to keep in mind when copying funnels: you should always create a new Event Registration List for your new funnel.  Also, your new funnel will have a new and different capture form URL you will need to copy into your new Initial Invitation as a link to the registration form.

Business Builder, Email Templates & Image Library, New Feature, Sales Funnels & Auto Scheduler , , ,

Removing a Contact from a Funnel

13. May 2014

Sometimes you may need to remove a Contact from a Funnel.  This contact may be in a Funnel where multiple emails are still scheduled to go out, and you wish to stop them from receiving any of them.  

The best way to remove them from the Funnel is to simply remove them from the contact list associated with the Funnel. We always recommend creating (and with a similar name to the Funnel) a new contact list for each Funnel so you can easily maintain the contacts. So in this case, you can follow these simple steps:

1) Login to your account, and access My Contacts from the left navigation

2) Search for the Contact you would like to remove from the Funnel


3) Find the Contact in the search results and click the pencil to the left to Edit the Contact Record

4) Click on the Contact Lists tab

5) Click on the Contact List that is used for the Funnel to select it and then click the Remove button.

6) Then click Save

The Contact is now removed from the Funnel and will not receive any additional emails in the Funnel. 

Important Note: 

When accessing the Reports and Statistics for the Funnel. Any stats associated with the contact that have been removed will still remain in the Statistics Snapshot. But if you drill down into a stat (i.e. Opens) the contact will not be in the list.

Quick Tip, Sales Funnels & Auto Scheduler, Business Builder , , ,