Events can be a great way to generate and nurture leads for your business. A number of elements that go into setting up online registration for an event, as well as promotions to attract people to register. Voodoo lets you manage your events painlessly.
Let’s say you have a multi-city roadshow and you’re responsible for the whole shebang. Voodoo handles it all with ease and eliminates unnecessary calls and emails to your event staff in each location.
- Set up separate invitations and registrations for each city with simultaneous centralized and local registration management.
- Set up local events to send real-time notifications to whomever you need—so Denver’s conference center knows to expect 332 attendees, and Dallas' caterer is ready to serve 210.
- Automated reminders keep people pumped up and ensure maximum attendance.
After the event, using capture forms, list automation, and message templates, you’ll reach out with unique content tailored precisely to those who attended and those who didn’t.
Voodoo is a great tool to use for any events, for both the registration process and the pre-event promotion. There are many different ways to utilize Voodoo for your events, and this post will walk you through a set up for the most common and simplified way.
Keep in mind once you set up one event in Voodoo, you can easily make a copy of everything for your next event.

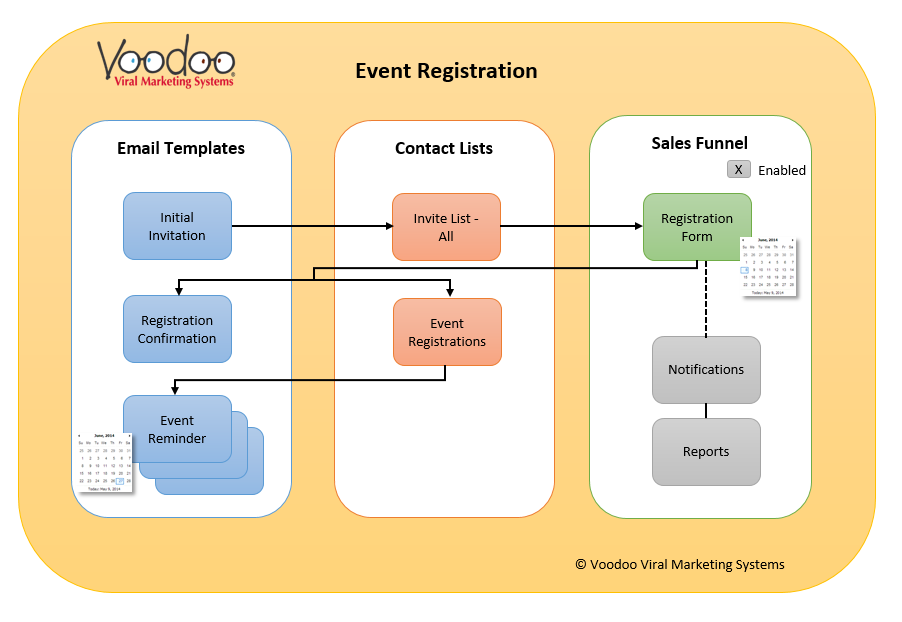
1) Create your Email Templates:
Initial Invitation Email - the email that will go out to the list of all contacts you invite to your event
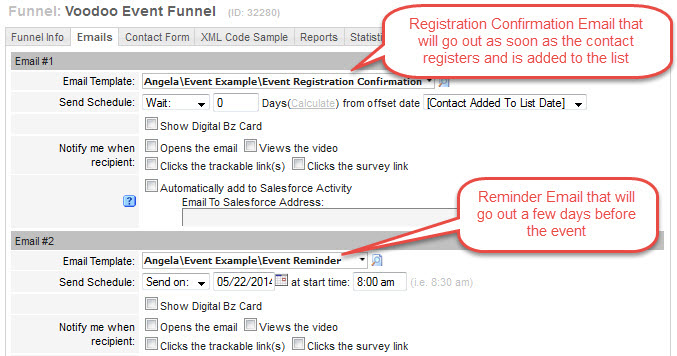
Registration Confirmation - the email that will be sent automatically after a contact registers for the event
Reminder of Event - a reminder automatically sent to contacts that have registered for the event, reminding them of the event, and including all the pertinent details
2) Create Contact Lists:
Contact List for the Initial Invitation - everyone who should receive the invitation email
Create an Empty Contact List to collect the Event Registrations in your Sales Funnel - for those who fill out the registration form, and who will receive the confirmation email and reminder. See Step 3.
3) Create a Sales Funnel:
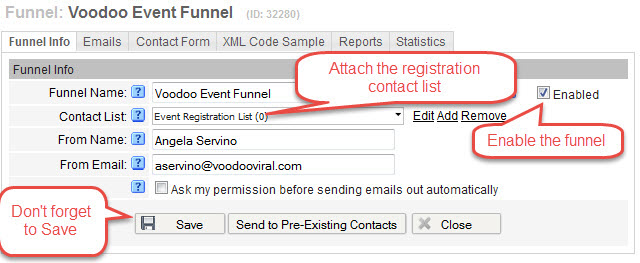
The Sales Funnel is what you will use to build your registration (contact) form, and schedule your confirmation and reminder emails. Be sure to enable the funnel by clicking the Enable box.
Attach the Registration Contact List to the Funnel. Any contacts who fill out the registration form will be added to this contact list.

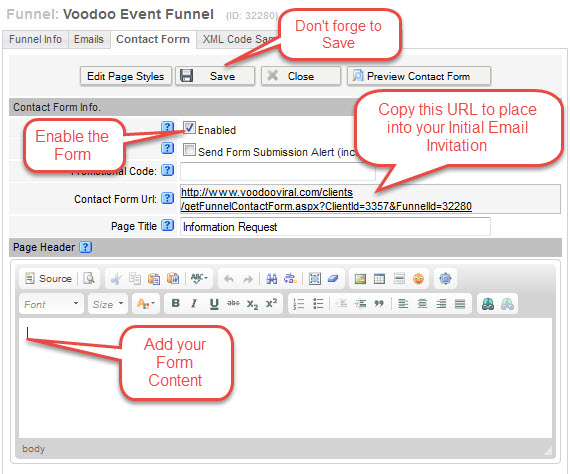
Create your Contact form in the Sales Funnel on the Contact Form tab. Be sure to Enable it by checking the box. Add your content using the Page Header, Form Header, Page Footer and Confirmation Page. Also here is where you select what form fields you want to include on the form. Be sure to Save.
Also copy the URL, so you can paste it into your Inititial Invitation Email (it will link to the registration form).

Add Your Confirmation Email Template and Reminder Email Template to the Sales Funnel.

Don't forget to hit Save. Once your funnel is set up and enabled, be sure to fully test all components before you send your Initial Invitation email.
Also, once you have set up a Sales Funnel for an event, you can easily copy an entire funnel to use as a template for your next event.

One thing to keep in mind when copying funnels: you should always create a new Event Registration List for your new funnel. Also, your new funnel will have a new and different capture form URL you will need to copy into your new Initial Invitation as a link to the registration form.
Business Builder, Email Templates & Image Library, New Feature, Sales Funnels & Auto Scheduler
events, registration, email reminders, sales funnels