We are excited to announce that Voodoo now offers Salesforce Integration. Users can easily access Voodoo's entire toolset from a tab in your Salesforce account.
Here’s how to automatically log emails you send from Voodoo as activities on Lead, Contact, and/or Opportunity records. Activity History will be updated based on your Email to Salesforce settings in salesforce.com.
Voodoo updates Contact Activity History by automatically blind carbon copying (BCC) your Voodoo emails to your Email to Salesforce address. Email content then appears updates the corresponding Contacts in your Salesforce account. (This feature matches Contact email addresses to determine which Contact Records will be updated.)
Important—For this feature to work properly, you must set up both accounts as follows:
In your Salesforce account:
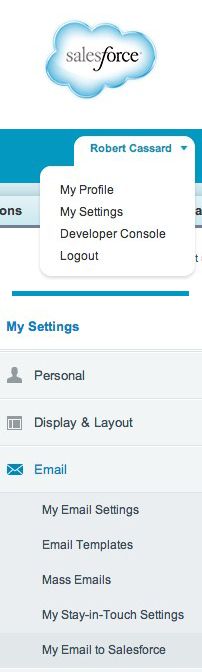
1. Log into your Salesforce dashboard
2. At the upper right click on Your Name > My Settings
3. On the My Settings page, choose Email > My Email to Salesforce.
Steps 5, 6 and 7 all take place on the resulting page.
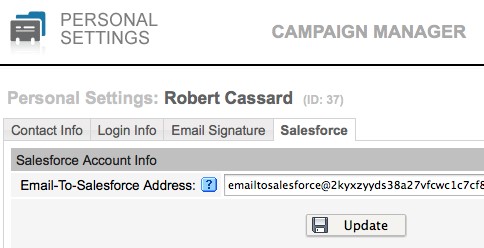
4. Copy the Email to Salesforce address so that you can paste it into your Personal Settings in Voodoo.
5. Enter the "From" email address used in your Voodoo account into the My Acceptable Email Addresses field in Salesforce. You can enter more than one address by separating them with a comma, for example if you use an alternate email address when sending from Voodoo Sales Funnels.
6. Select your desired Email Associations. Here you can determine how and where your Voodoo emails update your Salesforce account. You can select Opportunities, Leads and/or Contacts, depending on how you work.
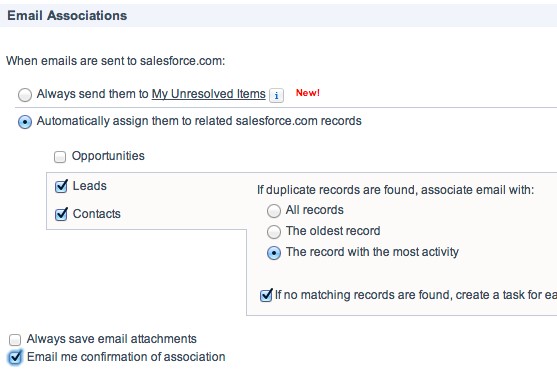
We DO NOT recommend using the Always Send them to My Unresolved Items option unless you like to make a lot of extra work for yourself!
Also beware of the Email me confirmation of association box.
Do not check this if you will be sending Voodoo campaigns to large groups of your Salesforce contacts. You will receive a confirmation email each and every time a Voodoo email gets associated with a Salesforce contact.
7. When your settings are as you want them, click Save
In your Voodoo account:
Visit your Personal Settings page, select the Salesforce tab, then paste in your Email-to-Salesforce address and click Update.
Note: If your organization has a Salesforce administrator, you may need ask the administrator to enable Email to Salesforce in your company's Force.com Administer settings.
Salesforce Administrator Instructions:
1. Check the Active box.
2. We do not recommend checking the Advanced Email Security Settings box. Click Save
At this point, the administrator will have the option to send an email to users indicating that Email to Salesforce is active.
If you would like to learn more about enabling this feature on your Voodoo account please contact us.
Business Builder, Salesforce
salesforce, integration