CSV Import Wizard

1. June 2016

Have lots of contacts in a CRM or Excel spreadsheet?  Use Voodoo's Import Wizard. 

Import Contacts from any file in CSV (or comma-separated) format. Click Manage Contacts for the Current Contacts list you want to populate. You’ll see 0 Contact(s) Found.

Start by exporting the list from your current email or contact management application. You might need to explore your current app’s help menus to learn how to export your selected data in CSV format. Most apps do this in their sleep!  Just Export or Save As a CSV file.

NOTE: You only need three database fields for a standard Voodoo Contact List: First Name, Last Name, and Email Address.   However, with Voodoo’s complete contact management features, you can also import other information about your contacts including: Company Name, Title, Address, City, State, Zip, Phone, Mobile Phone, Fax, Website URL, even Custom Fields you create.

How does Voodoo do that?

Voodoo keeps a hidden Master Contact List on your behalf, maintaining the unique Contact Data for each and every person in all of your Contact Lists, based on their unique email address.  You can even add and remove a contact from various lists very easily. 

Business Builder, Contact / Database Lists, Quick Tip, Business Builder How to Voodoo Guide

Reaching Out to Your Personal Contacts

25. April 2016

To really leverage the power of Voodoo, you need high-quality Contacts in your system. In the past, we've explored various sources for contact lists such as LinkedIn and your CRM.  One source of contacts that is easily available to you (but often overlooked) is the group of personal contacts in your address book 

Every now and then, it's a good idea to reach out this personal list.  Send a campaign to them occasionally to let them know what you and/or your business has been up to.  

This QuickTip will walk you through the easy steps of connecting with your personal contacts.  


Voodoo QuickTip #435 - Reaching Out to Your Personal Contacts

1)  Start by importing your Address Book from your current email contact manager. Voodoo has an easy, time-saving feature that allows you to import directly from the most popular email systems including:  Gmail, Yahoo Mail, Hotmail, Outlook and Apple Mail. Check out our blog post on how to use this feature: Import Contacts Directly from Your Address Book.  

2) As you import the list into Voodoo, use the check boxes to review and "scrub" the list by removing non-business contacts and contacts who would not be interested in what your business is doing. This allows you to import only the contacts you want.

3)  Next, craft and send a personal email that says hello, catches your contacts up on how you're currently helping your clients, and explaining how your business could possibly help them. Make sure to include a pass-along referral request something like this: "If you know anyone else who might benefit from what I do, please pass this message along. I really appreciate your help, and I'd enjoy helping them."
We've seen simple referral requests like this yield many thousands of dollars in new business. So go ahead and ask!     


Check out our Blog Post, Sources for Your Contact Lists for more ideas on where you can get more contacts for your Voodoo system. 

Build Campaigns, Business Builder, Contact / Database Lists, Quick Tip

New Voodoo Feature: Workflow Rules

11. April 2016

Voodoo is excited to announce a new feature for Business Builder users called Workflow Rules. This important automation feature allows campaign owners to add or remove contacts to or from lists based on specific trigger actions.  For example, when a contact opens an email, views a video, clicks a trackable link, they can either be add to or removed from any list. 

Now you can easily automate more campaign actions for effective follow-up with your contacts. And you can easily and automatically segment your lists based on actions that take place. 

Here's how you set up a Workflow Rule: .  

Voodoo QuickTip #832 - Workflow Rules

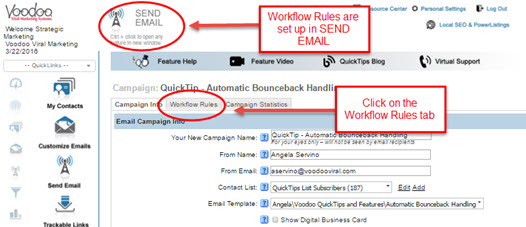
1)  After you have finished crafting an email template, and you are ready to send a campaign, go into Send Email.  We've added a tab on that page called Workflow Rules.  


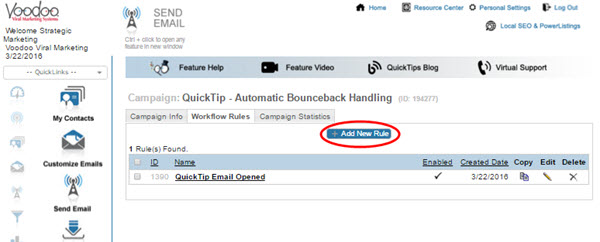
2) Click on the Add New Rule button to create a new Workflow Rule. 


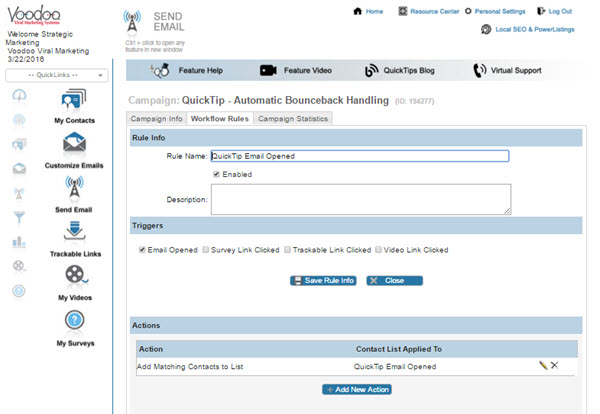
3) Give your rule a name. Check what would activate this rule. Choose from the following options (you can select more than one): Email Opened, Survey Link Clicked, Trackable Link Clicked, Video Link Clicked

4) You must save the rule before you can apply the action.  Once you click save, then select the action you want to occur when the contact performs the trigger action(s) above. The options are to add contact to a list or remove contact from a list. 


Once the Workflow rule is saved and enabled, the actions will take place. Below are are two  popular scenarios to use this feature for: 

Scenario 1:  Create Follow-Up Lists
Workflow Rules makes it easy to access contacts that require a call back or need additional follow-up. Set up a Workflow Rule to create a Call Back/Follow-Up List based on a specific Trigger, for example when a contact opens an email and then set an Action to add the contact to a specific list you choose.

Trigger Opened Email 

Action > Add Matching Contacts to ListWarm Lead List or Email Open List


Scenario 2:  Continue Marketing to a Specific Audience that has Shown Interest
Workflow Rules makes it easier to continue marketing to a specific audience after capturing initial interest. Many times an email is created with text for a specific situation (met at trade show, spoke on phone, etc). If the recipient of that email was to then to view a video, you could put them into a contact list attached to a funnel to follow up with more content related to that video. 

Trigger > Viewed Video 
Action > Add Matching Contacts to List: Nurturing Contact List attached to Funnel 

Of course, there are many other ways to use Workflow Rules. Review your campaigns to see how you can use this feature to save time and automate your follow-up.

Build Campaigns, Business Builder, New Feature, Quick Tip

Using Voodoo Videos Beyond Email

11. January 2016

Voodoo's mission is to help our customers accomplish more with a lot less effort. As your Voodoo Video Library grows, you will have additional opportunities to attract prospects using targeted, interactive content. And it's so important to know that these videos can easily be used for so much more than email...

We are currently hard at work improving our video library but in the meantime you can still easily post your Voodoo videos to your social media accounts, your website and even your email signature. No matter where you choose to use them, your videos will play in your custom-branded, personalized frame with your contact info and response link at the bottom.  If you’re using the full version of Voodoo, your video pages can even include your Digital Business Card and photo.


Read our Voodoo QuickTips Blog post on, 
How to Post Trackable, Personalized Videos on your Social Media Accounts

Why not use your OWN customized videos to engage visitors and generate more leads from your website, read more on Using Customized Videos on Your Website. 

Or simply promote your business by Enhancing Your Email Signature with Voodoo Video. 


Take advantage of this content that is already available to you.  Check out these Voodoo QuickTip Blog posts, and if you have any questions on other ways to leverage video, please just give us a call. 

Business Builder, eVideo Launcher, Quick Tip, Video Library & Trackable Links, Social Media , ,

When to use Quick Sends, Campaigns and Funnels

27. October 2015

Once you have created customized emails and added contacts to your Voodoo account, your next step is to start sending campaigns.  Voodoo Business Builder accounts offer a choice of how to send campaigns.  In this QuickTip we will review which ones are best for the scenarios you face.  

Voodoo QuickTip #173 - When to use Quick Sends, Campaigns and Funnels

Quick Send Quick Send: This is a great tool to reach new contacts and build your contact lists every day. Use this when you want to reach out quickly to one person or a small group and you want to add them to a Contact List at the same time. 

Send Email Send Email: Lets you send a single-stage personalized campaign (email template) to any group with a few simple clicks. You can choose automated notifications for when your emails get opened and videos are viewed, plus auto-response emails to follow-up for you.  From the Send Email page, you can also launch the Campaign Wizard to be guided step-by-step through the process.

For more detailed information, download and read our How to Voodoo Guide.


Funnels & Forms Funnels & Forms: Here's where you'll find the real magic of Voodoo for automated and multi-stage outreach. This area is full of features for power users, allowing you to create drip marketing campaigns, capture forms and automated triggers.

For more information on Funnels and Forms be sure to check out Forms and Funnels and Success Automation 101.


You can configure each feature to meet your needs in many ways.  Here are some examples of how to use each type of campaign: 

  • To send a one-off email (to one or two people) that you just met at a networking event, use Quick Send
  • To send a one-time campaign like an end of the month promotion (to one contact list, one time), use Send Campaign (once and done).
  • To send a recurring campaign that reminds customers to register for an event using the same email template, use Send Email with Auto-Scheduler (same email template/sent at certain intervals). The auto scheduler will look for the assigned list and new contacts added since the last send will get the next email. 
  • To run a perpetual campaign (where you add new contacts to the list over time) you should set up a Funnel and set wait time to “0” - knowing that anytime a contact is added they will get the email (this is a “once and done” option). 
  • To send recurring messages like expiration notices, set up a Funnel and configure the funnel set-up to trigger off of expiration dates or any dated custom field (not wait time or calendar dates). 


Business Builder users: consider how you want to use these features in your account. You can use available PowerPack time for us to help you with setup.  eVideo Launcher users: let us know if you're considering an upgrade to the full-featured version of Voodoo so you can have access to these advanced features (and much more). It's all about saving time and making you more successful.

Build Campaigns, Business Builder, eVideo Launcher, Quick Add & Send, Quick Tip, Sales Funnels & Auto Scheduler

How to Maintain an Updated Master List

28. September 2015

New Voodoo feature:. Both Business Builder and eVideo users now have a dynamic, system-generated contact list called All Contacts. You'll find the list in your contact lists area (My Contacts). This new read-only list shows all the contacts in your account (including opt outs and contacts used in QuickSends). 

Since the All Contacts list is a system-generated list that constantly changes, you can't attach it directly to a campaign. You can't run Contact List rules on it either.

So what do you use it for?

First, it gives you an easy way to see how many contacts your account is actively managing, and to remove specific contacts from all your lists.

Second, it gives Business Builder users an easy way to create and maintain your own Master Contact List. Then you can set up and run rules to segment your contacts, for example: 
 

  • to segment contacts by sales rep name, zip code, etc.
  • to segment by any custom fields (i.e. product type, customer type, lead source, etc.)
  • to remove opt-out contacts for an accurate snapshot of your active contact list

This QuickTip shows how easy it is to keep an updated Master List to turbo-charge your list segmentation and eVideo marketing results. 

Voodoo QuickTip #381 - How to maintain an updated Master List

To create your own Master Contact List, simply create the empty list, then import all contacts from your system-generated All Contacts list into your new Master List. 

1. Access My Contacts and click Add New Contact List.

Add New Contact List

2. Name your list Master Contact List and click Save

Add New Contact List

3. You will be taken to the Contacts tab where you click Import Contacts from Another List


Import From Another Contact List

4. From the Source Contact List option select All Contacts and for Destination Contact List select your new Master Contact List then click Copy. You now have an editable Master Contact List and you can run rules on it.

New Master Contact List

If you want to remove the contacts who have opted out from this new Master Contact List and get an an accurate count of active contacts:

eVideo Users can sort their Contacts by the Opt-Out column and manually move them to a new Unsubscribe List.  

Business Builder Users can automate the management of your Opt-Outs by creating a rule: 


1. From the My Contacts page click Manage Rules.


2. From the Manage Rules page click Add New Rule

Add New Rule

3. Add the new Rule Name (i.e. Remove Opt Outs from Master). Select the Master Contact List in the Apply Rule to contacts in this list. Then click Save Rule Info

4. Now you can add your conditions and actions: 

5. For Conditions, add a new condition: Optout = True 

6. For Actions, add a new action: Remove Matching Contacts from List. And add Master Contact List to Contact Lists Applied To.


Create New Rule to Remove Opt Outs

7. Be sure to Save, Enable and Run Rule.  Once the rule is enabled it will run continuously. No need to come back into your rules and manually run the rule - it is automatic! 

Business Builder users, create your new Master Contact List now by logging into your Voodoo account.

eVideo Launcher users, let us know if you'd like to upgrade to the full-featured version of Voodoo to have access to all the advanced features that save time and make you more successful.

Business Builder, Contact / Database Lists, eVideo Launcher, New Feature, Quick Tip ,

Voodoo Announces New Built-in Image Editing Functionality

7. July 2015
We've rolled out another powerful new feature—image editing functionality within Voodoo. You can now upload and instantly edit your images without leaving the Voodoo interface. Crop, resize and add text...even add effects and frames. 


This QuickTip explains how to use the new Image Editor to edit images you'll embed in your email templates and the photo used in your Digital Business Card. 

Voodoo QuickTip #211 - New Image Editing Feature

Editing an Image in your Image Library 

1.  Upload your image to the Image Library

2. Click the pencil icon to edit the image. Note:  When you edit an image and save the changes, you are updating the existing image. To keep the original image, make a copy (using the copy icon) first, then make edits to the copy. 


Image Library

3.  From the Edit File Info window click the Edit photo button. 

Edit Image File Info

4.  The Photo Editor will open and you will have access to many image options. Make your edits and then click Apply and then Save

Edit Image with Photo Editor

Editing an Image from an Email Template

1.  To edit an image already embedded in an email template, simply right-click on the image (control-click on a Mac) and select Image Properties.  

2.  From the Image Properties window select Browse Server.


Image Properties

3.  Find the Image in the list and click the pencil icon to edit the image. Note:  When you edit an image and save the changes, you are updating the existing image. To keep the original image, make a copy (using the copy icon) first, then make edits to the copy. 

Edit Image

4.  Make your edits to the image and click Apply and then Save

Edit Image with Photo Editor

Uploading and editing your Digital Business Card Photo:

1.  Go to Personal Settings in the Top Toolbar. 

Persona Settings


2.  Click on the Digital Biz Card tab. 

3.  From this screen you can edit the text in your Digital Business Card, upload a new photo and edit your photo.  


Digital Business Card

4. When making changes to your Digital Business Card photo, it's important to note that in order for the image to be displayed properly in your video frame, we recommend a size of 135:160 pixels. To make this easy for you we have added a crop preset called DBC Photo (4:5) to the Crop toolbar. Just click the Crop button on the toolbar.

Crop Toolbar

5.  To resize you image click the 
DBC Photo (4:5) button in the toolbar. This will size your photo appropriately. 

DBC Crop


4.  Click Apply and Save.  Once you made your changes be sure to also click the Update button from the Digital Business Card screen. 

Business Builder users, try the Image Editor right now by logging into your Voodoo account.  And eVideo Launcher users, let us know if you are interested in 
upgrading to the full-featured version of Voodoo so you can have access to Image Editing and lots of other features to save time and make you more successful.

Build Campaigns, Business Builder, Email Templates & Image Library, New Feature, Quick Tip ,