Voodoo Custom YouTube Video Feature

18. November 2015


Voodoo Business Builder users now you can choose any YouTube video, then frame it, share it and track it.


(Click the image above to see how easy it is.)


Add any YouTube video to your Video Library, then use your branded, personalized Voodoo version for prospecting and customer nurturing.

You can even record a video on your smartphone, then instantly frame it with your logo and contact information.

Say it in a video and stop repeating yourself.

If you have a Voodoo Business Builder account, this feature is live right now. Just visit your Video Library and click Add YouTube Video

For a limited time, individual eVideo Launcher users can get a discount upgrade to a Basic Business Builder account to have access to this new feature.* Contact support@voodooviral.com to explore your options.


*offer subject to change without notice.

Business Builder, eVideo Launcher, New Feature, Video Library & Trackable Links ,

How to Maintain an Updated Master List

28. September 2015

New Voodoo feature:. Both Business Builder and eVideo users now have a dynamic, system-generated contact list called All Contacts. You'll find the list in your contact lists area (My Contacts). This new read-only list shows all the contacts in your account (including opt outs and contacts used in QuickSends). 

Since the All Contacts list is a system-generated list that constantly changes, you can't attach it directly to a campaign. You can't run Contact List rules on it either.

So what do you use it for?

First, it gives you an easy way to see how many contacts your account is actively managing, and to remove specific contacts from all your lists.

Second, it gives Business Builder users an easy way to create and maintain your own Master Contact List. Then you can set up and run rules to segment your contacts, for example: 
 

  • to segment contacts by sales rep name, zip code, etc.
  • to segment by any custom fields (i.e. product type, customer type, lead source, etc.)
  • to remove opt-out contacts for an accurate snapshot of your active contact list

This QuickTip shows how easy it is to keep an updated Master List to turbo-charge your list segmentation and eVideo marketing results. 

Voodoo QuickTip #381 - How to maintain an updated Master List

To create your own Master Contact List, simply create the empty list, then import all contacts from your system-generated All Contacts list into your new Master List. 

1. Access My Contacts and click Add New Contact List.

Add New Contact List

2. Name your list Master Contact List and click Save

Add New Contact List

3. You will be taken to the Contacts tab where you click Import Contacts from Another List


Import From Another Contact List

4. From the Source Contact List option select All Contacts and for Destination Contact List select your new Master Contact List then click Copy. You now have an editable Master Contact List and you can run rules on it.

New Master Contact List

If you want to remove the contacts who have opted out from this new Master Contact List and get an an accurate count of active contacts:

eVideo Users can sort their Contacts by the Opt-Out column and manually move them to a new Unsubscribe List.  

Business Builder Users can automate the management of your Opt-Outs by creating a rule: 


1. From the My Contacts page click Manage Rules.


2. From the Manage Rules page click Add New Rule

Add New Rule

3. Add the new Rule Name (i.e. Remove Opt Outs from Master). Select the Master Contact List in the Apply Rule to contacts in this list. Then click Save Rule Info

4. Now you can add your conditions and actions: 

5. For Conditions, add a new condition: Optout = True 

6. For Actions, add a new action: Remove Matching Contacts from List. And add Master Contact List to Contact Lists Applied To.


Create New Rule to Remove Opt Outs

7. Be sure to Save, Enable and Run Rule.  Once the rule is enabled it will run continuously. No need to come back into your rules and manually run the rule - it is automatic! 

Business Builder users, create your new Master Contact List now by logging into your Voodoo account.

eVideo Launcher users, let us know if you'd like to upgrade to the full-featured version of Voodoo to have access to all the advanced features that save time and make you more successful.

Business Builder, Contact / Database Lists, eVideo Launcher, New Feature, Quick Tip ,

Voodoo Announces New Built-in Image Editing Functionality

7. July 2015
We've rolled out another powerful new feature—image editing functionality within Voodoo. You can now upload and instantly edit your images without leaving the Voodoo interface. Crop, resize and add text...even add effects and frames. 


This QuickTip explains how to use the new Image Editor to edit images you'll embed in your email templates and the photo used in your Digital Business Card. 

Voodoo QuickTip #211 - New Image Editing Feature

Editing an Image in your Image Library 

1.  Upload your image to the Image Library

2. Click the pencil icon to edit the image. Note:  When you edit an image and save the changes, you are updating the existing image. To keep the original image, make a copy (using the copy icon) first, then make edits to the copy. 


Image Library

3.  From the Edit File Info window click the Edit photo button. 

Edit Image File Info

4.  The Photo Editor will open and you will have access to many image options. Make your edits and then click Apply and then Save

Edit Image with Photo Editor

Editing an Image from an Email Template

1.  To edit an image already embedded in an email template, simply right-click on the image (control-click on a Mac) and select Image Properties.  

2.  From the Image Properties window select Browse Server.


Image Properties

3.  Find the Image in the list and click the pencil icon to edit the image. Note:  When you edit an image and save the changes, you are updating the existing image. To keep the original image, make a copy (using the copy icon) first, then make edits to the copy. 

Edit Image

4.  Make your edits to the image and click Apply and then Save

Edit Image with Photo Editor

Uploading and editing your Digital Business Card Photo:

1.  Go to Personal Settings in the Top Toolbar. 

Persona Settings


2.  Click on the Digital Biz Card tab. 

3.  From this screen you can edit the text in your Digital Business Card, upload a new photo and edit your photo.  


Digital Business Card

4. When making changes to your Digital Business Card photo, it's important to note that in order for the image to be displayed properly in your video frame, we recommend a size of 135:160 pixels. To make this easy for you we have added a crop preset called DBC Photo (4:5) to the Crop toolbar. Just click the Crop button on the toolbar.

Crop Toolbar

5.  To resize you image click the 
DBC Photo (4:5) button in the toolbar. This will size your photo appropriately. 

DBC Crop


4.  Click Apply and Save.  Once you made your changes be sure to also click the Update button from the Digital Business Card screen. 

Business Builder users, try the Image Editor right now by logging into your Voodoo account.  And eVideo Launcher users, let us know if you are interested in 
upgrading to the full-featured version of Voodoo so you can have access to Image Editing and lots of other features to save time and make you more successful.

Build Campaigns, Business Builder, Email Templates & Image Library, New Feature, Quick Tip ,

Resend to Unopens with One Click

19. May 2015

Many marketers send out a single email broadcast to a contact list and hope for the best. But according to BtoB Online, the average open rate for marketing emails is 19.7%. What about the 80+% that don't open your email after the first send?  Try resending the same campaign to those who haven't opened yet (we call them "Unopens"). You'll probably be surprised how many new Opens you get!

Voodoo now lets you send a duplicate email to your Unopens with just one click—all WITHOUT creating a new email, list or campaign. It only takes a minute.

Voodoo QuickTip #512 - Resend to Unopens

We recommend users visit My Reports (eVideo users visit Tracking Statistics) to check their campaign performance about 24-48 hours after the initial send. Want to send a second email to recipients who haven't yet opened the email?  Just follow these steps: 

1.  Access reports for your campaign: 

Business Builder users access My Reports to view the Campaign Report. 

eVideo Launcher users click View Tracking Statistics and select the campaign. 
My ReportsView Tracking Statistics

2.  Within the Campaign Statistics tab you can view the basic metrics associated with this campaign. Click on the Unopens metric to drill down and see the Unopens. 
Tracking Stats

3.  From the Unopens detail screen, click the green Resend to Unopened button towards the bottom: 

View Unopens

4.  You will then see a confirmation message asking if you are sure you want to Resend to Unopened. Click OK. 


4.  It's that easy!

5.  Business Builders can also access the resend feature from the Send Email page.  Just go to Send Email and you will see a list of all your campaigns:

Resend to Unopens from Send Campaign

6.  Then, just click the Resend link next to the campaign you wish to resend to the unopens.   

Wait 24-48 hours after Resending to Unopens then log back in to Voodoo to check your open rate. The new opens will be included in the Campaign Report making your stats cumulative in one easy report: 

Campaign Report

Build Campaigns, Business Builder, eVideo Launcher, New Feature, Quick Tip , ,

Voodoo's Built-In Help

1. May 2015

Are you taking full advantage of every Voodoo feature?  Voodoo recently launched our streamlined Business Builder interface for full system users.  Despite many improvements to the interface, no functionality has been removed.  This week's QuickTip revisits Voodoo's Built-In Help features within the new interface. (This does NOT affect eVideo Launcher users). 

Let's take a look at our training and help resources so you can maximize results from whichever version of Voodoo you have.

Voodoo QuickTip #222 - Voodoo's Built-In Help

Business Builder Users:

Each time you login Voodoo, you're greeted by the My Dashboard page with a column of buttons on the left showing the main features. There are important learning aids built into the interface. All support options are now located within the Support Menu Bar located towards the top.  

Support Bar

In this bar you have access to the following:

1.  QuickTour


QuickTour

Take a quick look at each Voodoo feature. The first time you log in, the QuickTour will dim your screen and walk you through the system. (Replay the QuickTour anytime through the Dahsboard's Support Menu Bar.)

2.  Video Overview

Video Overview

This is a video tutorial showing the primary features of your Voodoo Business Builder account. This is a great place to start learning how to use your system.


3.  QuickTips Blog

Voodoo QuickTips Blog


The goal of our blog is to turn you into a Voodoo Superuser.  You'll learn about new features, get QuickTips to help you leverage features more effectively, and discover create ways to use Voodoo. Check out our Voodoo QuickTips Blog Post, Where Did That Feature Go? to get a list of the old feature names and where to find them now.

4.  Virtual Support
Click Virtual Support to submit a ticket to our Support Team.  


5.  Campaign Building Guide

Campaign Building Guide


In the Resources section users have access to the "How to Voodoo" Campaign Building Guide. This downloadable PDF explains most features of your Business Builder account in detail and answers the questions that come up while building Voodoo Campaigns and creating re-usable email templates to save time. (You'll also find a link to the guide on the Voodoo QuickTips Blog.) 

Feature Help

6.  Feature Help

Once you access any Voodoo feature, a Feature Help option will appear in the Support Menu BarClick this to reveal concise written instructions for that specific feature.  We regularly update these, so please use them.

7.  Feature Video
Once you access any Voodoo feature, a Feature Video option will also appear in the Support Menu Bar. These are in development but will contain short video instructions for that specific feature. 

8.  Voodoo Viral Support Twitter Feed


Follow the Voodoo Viral Support twitter feed @VoodooQuickTips.  This library of tips and tricks will help you get the most from Voodoo and always be up on the latest feature news and  new posts on our QuickTips Blog.

9.  Contact Support Directly
Can't find the answer to your question with all the resources provided above? Call or shoot me an email and I will connect you to the assistance you need.


eVideo Launcher Users: 

The recent changes did not affect eVideo Launcher Users, but you may still be interested in where to find your help features: 

1) More Detail on this Step - As you progress through each eVideo Launcher step, you will see an icon for More Detail on this Step. Click this link to watch a Video Tutorial for that step, including written instructions in the right column.  The main dashboard includes a complete overview, while subsequent pages cover each step in detail.

More Detail on this Step
Detail on Step

2) Contact Us - Located at the bottom of Voodoo you have access to a Contact Us link. Here you can submit a support center request and someone from our support team will contact you to address any questions or technical issues.
Contact Us

3)  Visit the QuickTips Blog and Voodoo Support Twitter Feed (listed above) to learn about new Voodoo features, get QuickTips to help you leverage all the features of Voodoo, inform yourself about tools to use with Voodoo to maximize results and discover create ways to use Voodoo.  

Business Builder, eVideo Launcher, New Feature, Quick Tip , , ,

Easily Preview Videos in Your Custom Branded Video Frame

22. October 2014

Whether you're an eVideo Launcher or Voodoo Business Builder user, we've just made it easier for you to preview videos in your custom-branded and personalized video frame and share them anywhere you want. (Voodoo Business Builder users can preview the Digital Business Card feature, too.)  

You simply Preview each video, then copy the URL to share your branded and personalized videos "outside" Voodoo. You can create text and graphic links in Websites, Landing Pages, Social Media & Email Signatures.

Voodoo Feature #572 -
Leverage Videos in your Custom-Branded Personalized  Video Frame


Instructions for Voodoo Business Builder Users

1.  Login to your Voodoo account


2.  Access your Video Libary using the My Videos Icon

My Videos

3.  Click on the green arrow for the video you wish to preview or share. You can view the video link with a standard Personalized Frame or complete with your Digital Business Card. 


Preview Video  


4.  Once the video opens, copy the URL address from the top of your browser window and use it anyway you choose.  (Note: before sharing your link in social media, we recommend shortening the URL address with a link shortener like this one from Google.)

 Instructions for eVideo Launcher Users

1.  Login to your Voodoo account 

2.  Start a new campaign by selecting the Start New Campaign button


3.  In Step 1 of setting up a new campaign, where you choose your campaign, you will now see green play arrow icons that you can click to preview your video.  

eVideo Launcher Preview Video


4.  Once the video opens you can easily copy the URL from the top of your browser window and use it anyway you choose. (Note: before sharing your link in social media, we recommend shortening the URL address with a link shortener like this one from Google.)

Digital Business Card


Digital Business Card replaces the standard footer of your custom webframe. You can add a photo, name, office and mobile phone, email address and custom sales text. This personal touch improves response rates by 3-7% on most campaigns.

eVideo Launcher users: learn more about upgrading to get access to your own Digital Business Card.  
Find out more about the full-featured Voodoo Campaign Manager here.

A Digital Business Card helps prospects and customers remember you, feel more comfortable, and more likely to take action


Build Campaigns, Business Builder, eVideo Launcher, New Feature, Video Library & Trackable Links ,

Contact List Rules now available to ALL Business Builder users

30. September 2014

Voodoo is excited to announce that Contact List Rules are now available to all Voodoo Business Builder users.  

Contact List Rules offer unlimited opportunities to process and sort your data, and to automate the addition and removal of contacts to and from specific lists based on the most often used criteria.  You can run a rule one time to generate a targeted list, or you can leave a rule in place and running in the background ALWAYS moving and sorting contacts as required for your success. This QuickTip will walk you through the basic steps of creating a Contact Rule. 

Voodoo Feature #58 - Contact List Rules now available to ALL Voodoo Business Builder users


Voodoo Business Builder users, just follow these steps to set up a Contact Rule:

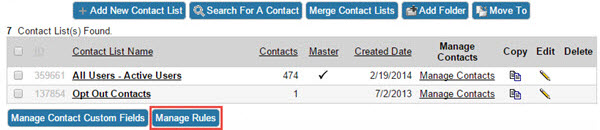
1.  Log into your Voodoo account and access My Contacts.

My Contacts
2.  Click the Manage Rules button

Manage Rules


3.  Click + Add New Rule.  Give your rule a name, for example, Segment by Region. In this example you can pull out all your contacts in Arizona and put them in another Contact List.  (You can add a Description if you'd like, so you can easily recall the purpose of the rule.)

Create New Rule

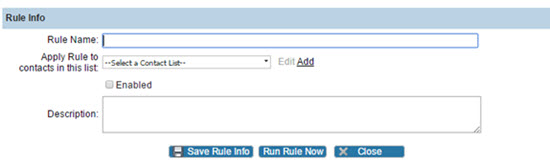
4.  Next, select a Contact List next to Apply Rule to contacts in this list.  Your rule will be applied only to contacts in this list—this will be true both now and in the future, if you leave the rule in place.

5.  You also must check the Enabled box, and Save Rule Info.  Once these steps are completed, your Conditions panel will open. 


Conditions

Ask yourself: What Condition(s) must be present for a desired action to take place?

6.  Click + Add New Condition to add the first condition.  Select a Field, such as State (assuming you have addresses for your contacts) from the pull-down list, then choose a Qualifier, such as <>, Contains, Starts With, Ends With or Doesn't Contain. For example, selecting State = AZ would result in every email address containg AZ in the state field to be selected.  

7.  From here, you can add one or more additional Conditions using AND or OR.  Using AND means BOTH conditions must be satisfied for an Action to be taken.  Using OR means that either condition will result in an action.


Finally, ask yourself: What Actions should take place if the required Conditions are met?

8.  Click + Add New Action and select whether to Add or Remove Contacts from one or more selected Contact Lists when the required conditions are met.


Actions


9.  IMPORTANT: Once your rule is all set up, always click Save Rule Info, then Run Rule Now.

There are many different ways you may want to segment your contacts, and Voodoo's Contact List Rules make it both easy and efficient. Start thinking about how you want to segment your contacts and target them with relevant content.

Voodoo Business Builder users, give this a try right now by logging into your Voodoo account.  And eVideo Launcher users, this is another important reason to upgrade to a full-featured version of Voodoo.

Business Builder, Contact / Database Lists, New Feature ,