Voodoo's Built-In Help

6. April 2014

Are you taking full advantage of your Voodoo features?  Voodoo gives you instant access to many built-in help features.  So let's take a look at the training and help resources so you can maximize results from whichever version of Voodoo you have.

Voodoo Feature #115 - Voodoo's Built-In Help


eVideo Launcher Users:


1) More Detail on this Step - As you progress through each eVideo Launcher step, you will see an icon for More Detail on this Step. Just click this link to watch a Video Tutorial for that step, including written instructions in the right column.  The main dashboard includes a complete overview, while subsequent pages cover each step in detail.

2) Contact Us - Located at the bottom of Voodoo you have access to a Contact Us link. Here you can submit a support center request and someone from our support team will contact you to address any questions or technical issues.


Campaign Manager Users:

Each time you login Voodoo, you're greeted by the My Dashboard page with a list of buttons in the left column showing the main features of the system. There are several important learning aids built right into the interface: 

1) Campaign Building Guide - At the bottom of the navigation bar on the left, in the Success Tools section, you’ll find a Building Guide link. This downloadable document explains many features of your Campaign Manager in detail and answers most questions that may arise while you build Voodoo Campaigns and create re-usable email templates to save you lots of time. You can also access the guide here: 

Click to download the Voodoo Campaign Building Guide.
 

2) Campaign Manager Complete Tutorial -  Also in the Success Tools section, is a button labeled Video Tutorial.  This is a 3-minute video tutorial that will demonstrate the basic features of your Campaign Manager.  While the tutorial doesn't cover some of Voodoo's newer features, it still provides a good sense of the system’s core.


3)
Feature Page Overviews - Toward the upper left corner of each feature page, you’ll see a Click Here to Learn How to Use This Feature link with a small arrow and the little “Magic Man” icon.  Click to reveal complete instructions.  We regularly update these, so please use them!


4) Support Center - Located at the top right of the Voodoo interface, you'll see a clickable Support Center link. Use this to submit a support center request and someone from our support team will contact you to address any questions or technical issues.


More Resources Available to All Voodoo Users: 


1) Voodoo Viral Support twitter feed – This library of tips and tricks will help you get the most from Voodoo and always be up on the latest feature news.  On Twitter, go to @VoodooQuickTips and then follow  


2) Contact Support directly - If you can't find the answer to your question with the resources provided above, you are welcome to call or email our support team and they will connect you to the assistance you need.


Voodoo Support
support@voodooviral.com
949.309.2847 option 4 

Business Builder, eVideo Launcher, New Feature, Team Member Management , ,

Using Customized Video on Your Website

5. April 2014

Want to magnify results from your Voodoo account?  As your video library grows, you will have additional opportunities to attract prospects using targeted, interactive content.

Another way to take advantage of Voodoo is to post these videos on your company website.  The most flexible way is to place a small thumbnail image from the video on your website.  Link the thumbnail to one of your Voodoo videos.  When visitors click-through, they'll see a full-size version in your company's custom frame. 

Take a look at how one Voodoo customer uses Voodoo videos linked to thumbnails on their website:


You have powerful videos in your Voodoo account, why not use them to engage more visitors (and generate more leads) on your website.  Here's how:

Voodoo Feature #289 - Using Customized Videos on Your Website

Work with your web designer to create a thumbnail image that is the ideal size for your website/webpage. 

Next, link this thumbnail to your video (from your Voodoo video library). Follow these steps to obtain the URL for the video you wish to post:


eVideo Launcher Users: 


1) Login to your eVideo Launcher account and click Start a New Campaign.

2) Your list of campaigns will appear, find the campaign that contains the video you would like to post and click the Preview Email icon to the right.


3) In the preview window for the email, click the link to access the video.

4) Copy the entire link from the URL bar at the top of your web browser window.

5) Since the URLs are oftenlong we recommend you use the Google Link Shortener or any number of other free services to make it short. 

6) Use this URL as the link from your thumbnail image that is displayed on your website.

7)  If you would like to use Voodoo's trackable links to track the link clicks on your website, please click here to read how to post Voodoo links on social media to learn how to set it up.

Business Builder Users:

1)  Login and access My Videos.

2)  Click the green play arrow for the video you want to post.


3) Copy the entire link from the URL bar at the top of your web browser window.

4) Since the URLs are often long we recommend you use the Google Link Shortener or any number of other free services to make it short. 

5) Use this URL as the link from your thumbnail image that is displayed on your website.

6)  If you would like to use Voodoo's trackable links to track the link clicks on your website, please click here to read how to post Voodoo links on social media to learn how to set that up.

eVideo Launcher, New Feature, Video Library & Trackable Links, Business Builder ,

Updated HMTL Editor

4. April 2014

We've updated our HTML Editor. Clear your cache to load the new version.

If you build your own email templates in Voodoo, you'll love the subtle but important improvement we rolled out today.  The HTML editing toolbar has been updated for
greater stability and to produce cleaner HTML5 code behind the scenes.  It looks and feels familiar but will perform more predictably across all kinds of browsers. 

To see the newest toolbar, simply refresh your browser.   This will force the new icon images to download.  In most cases, simply pressing the F5 key does the trick. 
(If not, you'll want to clear your browser cache manually.  Check your browser's Help menu and search under "clear cache" or "clear browser cache").

Click here to log in, clear your cache and make some magic.

Business Builder, Email Templates & Image Library, eVideo Launcher, New Feature ,

Previewing and Testing Emails

4. April 2014

Let's explore a vital step in your communications process: testing your emails.  Why is this so important?  Well, it's happened to all of us. We craft the "perfect" email only to discover a typo or incomplete link after it's been broadcast to a large number of recipients.

This feature tip contains the steps you should take to test your email campaigns before you send them out.

Voodoo offers multiple ways to test emails.  You can Preview the email from the email template, send a test email right from the template editor (Sales Magic Users), or build an actual campaign to send the email to a test list you have created.  These are all useful features to get you through the creative and testing processes.

By far the best way to test your emails (we cannot stress this enough) is the last of those 3 options.  Always send an actual Test Campaign to your test list (including yourself) before sending to a larger group. This will allow you (and/or other team members) to click through to check your video, survey or trackable links, your tracking stats, etc.  You'll receive the real campaign email, see exactly what your contacts will see, and make sure everything is working perfectly.  It's that easy to avoid heartbreak and embarrassment!

Voodoo Feature #222 - Previewing and Testing Emails

eVideo Launcher users: to create your internal test list and fully test your email templates follow these steps:


1)  Login to your account and access the Email Template.

2)  On Step 2.  Choose Recipients, select to enter your test contacts one at a time.


3)  Name your contact list so you can easily identify it as your permanent test list (i.e. Testing, Testing Only).


4)  You’ll use this small test list to send your campaigns to yourself and/or other colleagues so enter your testers' email information (email, first name, last name, company name). Click Next.


5)  Add any personalization you would like to test.  Click Next.


6)  Preview your email and launch your test email by clicking Send Campaign.

7)  Check your email for typos and be sure to test all the links.


8)  Once tested you can send out your broadcast to your larger group of recipients.

Campaign Manager users: to create your internal test list and fully test your email templates follow these steps:

1)  Access your Contact Lists and click Add New Contact List.

2)  Name your contact list so you can easily identify it as your test list (i.e. Testing, Testing Only).  Click Save.


3)  Click on the Contacts tab and Click Add Contact.  Enter the details for your testers and click Add.


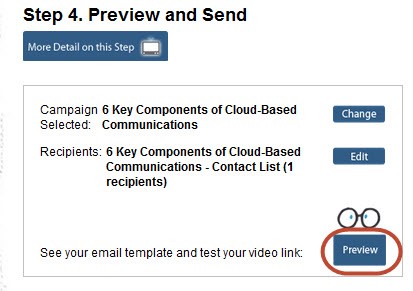
4)  After you have created your email template (and saved it), from the template you can first preview the email.  Click the Preview Email button to see how your email looks and how your embedded links are performing. These previews contain your active links, so you can test and make sure each link will take your recipients right where you intend them to go.

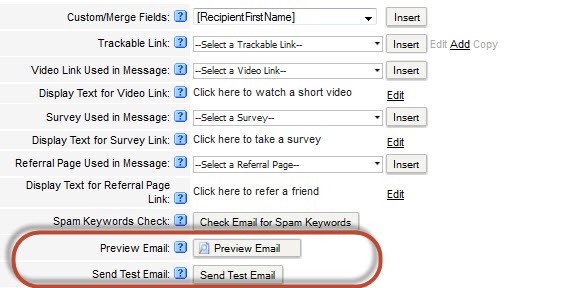
5)  You can also Send Test Email directly from the email template.  Just click the Send Test Email button to send yourself a copy of the template to check its content, formatting and video link, as delivered to your in-box. Note: This test email is NOT identical to an actual campaign broadcast: 

It does not have a reference Contact List to access for the RecipientFirstName and other custom fields.   

Because of this missing active content, the test is more likely to get identified as junk or SPAM.

The test delivery will NOT be monitored in your tracking stats. It’s for your reference only.

6)  Because step 5 will not give you an email that is identical to the one broadcasted, it's important to send an identical one to your test list.  Access the Campaign Wizard or Build/Send Campaign and send your email template to your internal test list to see exactly what your recipients will see.

7)  Check your email for typos and be sure to test all the links.


8)  Once tested you can send out your broadcast to your larger group of recipients.


After creating your internal test list one time, you will use it over and over again.

Build Campaigns, Business Builder, Email Templates & Image Library, eVideo Launcher, New Feature , ,

Custom Campaign Name for Quick Sends

3. April 2014

We know how it goes.  In the course of business, there are many times you want to enter a new contact, add it to one of your contact lists AND send an email...all at the same time. Most Sales Magic users already use Voodoo's Quick Add & Send feature.

Because this feature is used so often, we've rolled out a feature that lets you customize the campaign name for each Quick Add & Send. This makes it easier to review the performance of each Quick Send, including specific tracking statistics for each send. 

Voodoo Feature #365 - Custom Campaign Name for Quick Add & Send

Campaign Manager users, you will want to utilize Quick Add & Send when reaching out to a very small group or an individual - not a large group.  It's best for new contacts and one-off emails that come up in the course of business.  In the Quick Add & Send area under Campaign Name, you will now see a auto-populated name that defaults to include the Recipient's First Name, Last Name and the Send Date and Time.  These details make it easy to reference it later if you DON'T rename the campaign.  But you can also type whatever new, customized name you want into this field for easy reference. Just follow these simple steps:

1)  Click the Quick Add & Send

2)  Take note of the detailed Campaign Name that will auto-populate

3)  Change the Campiagn Name if you want by replacing wahtever you want in that field

4)  Choose the Email Template

5)  Enter information for the contact.  If it's a new contact, select the contact list to which your recipient should be added

6)  Select any Auto Action Alert and Report options you would like

7)  Click Send

Campaign Manager users,give it a try right now by logging into your Voodoo account.  And eVideo Launcher users, this is just one more reason to consider upgrading to the full-featured version of Voodoo.

Business Builder, New Feature, Quick Add & Send ,

Contact Records: Hidden Features & Benefits

2. April 2014

Did you know Voodoo contains features designed to improve your prospecting?  Powerful contact management features let you review and edit any individual contact's information with ease. 

We're not just talking about basic contact information like Name and Address.  You can also view a complete Send History and have the ability to keep Notes on each and every contact.  So when you are on the phone with your prospect, you can quickly check the Voodoo contact record and reference this information to improve your interaction. (For example, "Did you take a look at that email I sent you on our special pricing?" Of course, you already know the answer!).   You can also take notes on the conversation you had with them.


Voodoo Feature #221 - Contact Record Detail

Within each contact record you can easily access detailed information about the contact:


Contact Info
On the Contact Info tab, you will see all the basic information for the contact.  You can view or edit any of the information. Just click the update button to make any changes.
 
Contact Lists
See what Contact Lists this person is a member of. By selecting one or more lists, then clicking on the Add or Remove button, you can easily add or remove your contact from specific lists.

 
Custom Fields (Business Builder Users Only)
The Custom Fields tab contains any of the custom fields you have set up in your account.  Similar to the contact info, you can make any changes needed.  Click Save when you are done. 

Survey Responses (Business Builder Users Only)
Has this Contact completed a Smart Survey?  If so, the responses will be compiled on this tab.
 
Send History
The Send History is powerful.  You'll see a complete list of all sends to a given contact. Which campaigns were sent and when?  Did s/he open the email and/or view the video?  Find out here! 


Notes

Did you know you can add Notes about a contact? This useful tool lets you reference Notes easily when needed.  Contents of your Notes field will also be included when you Export a Contact List.


Here's how easy it is to get to all this valuable information...

eVideo Launcher Users: 


1) From your dashboard select View Tracking Statistics.

2) Select a campaign that was sent to Contacts you would like to view/edit.

3) Click the plus sign next to any of the options (Sent, Opened, Video Views) to expand that item and view contact records.

4) Click the Edit link on the right to open and edit any contact record.

5) Using the tabs across the top, you can now view and add Contact Info, change which Contact Lists this contact is a member of, review the contact's complete Send History, add time-stamped Notes to that contact’s information and more.

6) Make your changes and additions and then click Update/Save.

Business Builder Users:

1)  Users can access the contact record details from Contact Lists area, use the Search for a Contact button, then search for the contact you want.  Also access the contact from Tracking Statistics by selecting a campaign, then click the Plus sign next to any of the options (Sent, Opened, Video Views) to expand that item to view contact records.

2) Click the Edit link on the right to open and edit any contact record.

3) Using the tabs across the top, you can view and add Contact Info, change which Contact Lists this contact is a member of, review the contact's complete Send History and add time-stamped Notes to that contact’s information.

4) Make your changes and additions and then click Update/Save.


When you have a moment, log into your Business Builder or eVideo Launcher Voodoo account and take a look at a few of your contact records.

Business Builder, Contact / Database Lists, eVideo Launcher, New Feature

Automated 3-Day Daily Statistics Reports

2. April 2014

To be successful with email marketing, you need to know how well your campaigns are performing. 

Marketers often put so much effort into building a campaign, getting it launched, then have to quickly move on to the next project that they sometimes forget to go back in and check the results of their current campaigns.

Voodoo offers a variety of options to track your campaign results. Generally, the first place to go after you launch a campaign is Tracking Statistics (accessed from the View/Edit section of the dashboard). Today's New Feature automatically helps you to stay on top of the results of your campaigns...

In Voodoo, both eVideo Launcher and Campaign Manager users can easily choose to have a daily statistics report sent via email for the first 3 days (the most critical days) of a campaign.  Automating this task allows you to check the results of your campaign and follow up immediately with your contacts that have interacted with your emails and linked content.

Voodoo Feature - Automated 3-Day Daily Statistics Reports


Here's what you do:

eVideo Launcher Users:

1) Go through the normal steps of setting up your campaign.

2) When you get to the Send section, check the box labeled Send me a Daily Statistics Report email for the next 3 days.

3) Send your campaign.

4) You will receive your first statistics report in approximately 24 hours.


Campaign Manager Users:

1) After you have created your email template, then you go to Build/Send Campaign.

2) Select the email template you want to use in your campaign.

3) In the Auto Response options, select the check box for Send Daily Statistics Report for the first 3 days of campaign.

4) Ensure the To: email address is the correct email you would like the statistics sent to.

5) Continue on with the rest of the options to send your campaign.

6) You will receive your first statistics report in approximately 24 hours.


You will receive valuable information in the Campaign Statistics Report such as:

  • Total Sent
  • Cumulative Optouts
  • Opened
  • Video Views
  • And more...


Campaign Manager and eVideo Launcher users can benefit from this feature right now by logging into your Voodoo account.

Business Builder, eVideo Launcher, New Feature, Tracking Statistics ,