Using Voodoo Sales Funnels for Event Invitations & Registrations

6. June 2014

Events can be a great way to generate and nurture leads for your business.  A number of elements that go into setting up online registration for an event, as well as promotions to attract people to register. Voodoo lets you manage your events painlessly.

Let’s say you have a multi-city roadshow and you’re responsible for the whole shebang. Voodoo handles it all with ease and eliminates unnecessary calls and emails to your event staff in each location.

  • Set up separate invitations and registrations for each city with simultaneous centralized and local registration management.
  • Set up local events to send real-time notifications to whomever you need—so Denver’s conference center knows to expect 332 attendees, and Dallas' caterer is ready to serve 210.
  • Automated reminders keep people pumped up and ensure maximum attendance.    


After the event, using capture forms, list automation, and message templates, you’ll reach out with unique content tailored precisely to those who attended and those who didn’t.

Voodoo is a great tool to use for any events, for both the registration process and the pre-event promotion. There are many different ways to utilize Voodoo for your events, and this post will walk you through a set up for the most common and simplified way. 

Keep in mind once you set up one event in Voodoo, you can easily make a copy of everything for your next event.

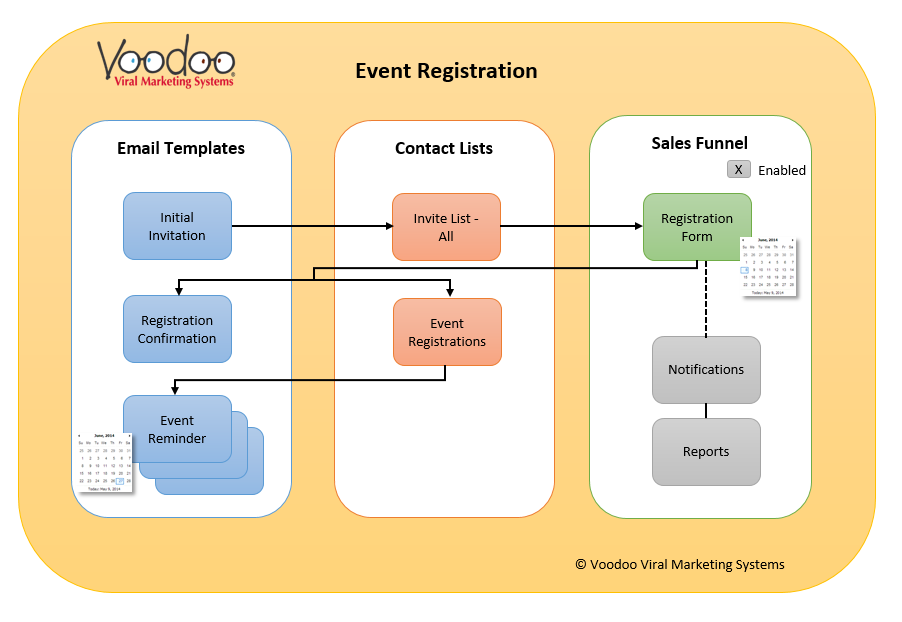
1) Create your Email Templates:

Initial Invitation Email - the email that will go out to the list of all contacts you invite to your event

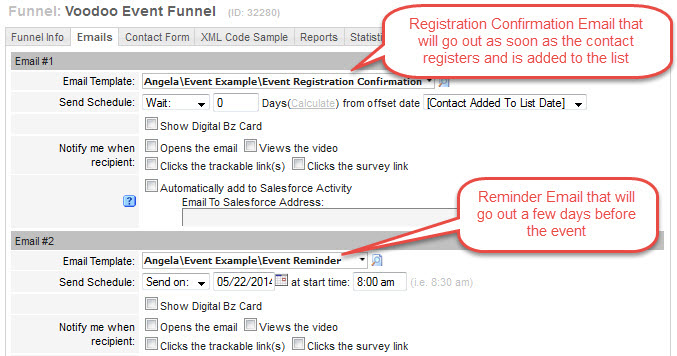
Registration Confirmation - the email that will be sent automatically after a contact registers for the event

Reminder of Event - a reminder automatically sent to contacts that have registered for the event, reminding them of the event, and including all the pertinent details

2)  Create Contact Lists:

Contact List for the Initial Invitation - everyone who should receive the invitation email

Create an Empty Contact List to collect the Event Registrations in your Sales Funnel - for those who fill out the registration form, and who will receive the confirmation email and reminder. See Step 3.  

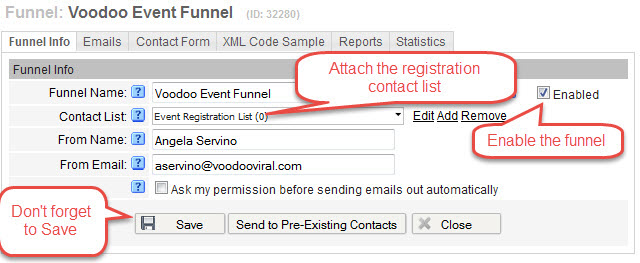
3)  Create a Sales Funnel:

The Sales Funnel is what you will use to build your registration (contact) form, and schedule your confirmation and reminder emails.  Be sure to enable the funnel by clicking the Enable box.  


Attach the Registration Contact List to the Funnel Any contacts who fill out the registration form will be added to this contact list.


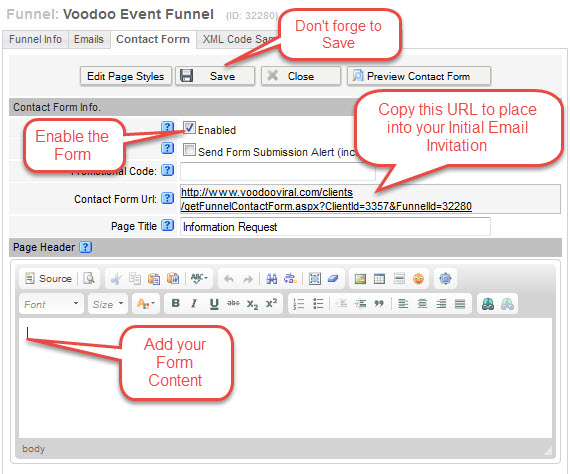
Create your Contact form in the Sales Funnel on the Contact Form tab.  Be sure to Enable it by checking the box. Add your content using the Page Header, Form Header, Page Footer and Confirmation Page. Also here is where you select what form fields you want to include on the form. Be sure to Save.

Also copy the URL, so you can paste it into your Inititial Invitation Email (it will link to the registration form).

Add Your Confirmation Email Template and Reminder Email Template to the Sales Funnel. 

Don't forget to hit Save.  Once your funnel is set up and enabled, be sure to fully test all components before you send your Initial Invitation email.

Also, once you have set up a Sales Funnel for an event, you can easily copy an entire funnel to use as a template for your next event. 


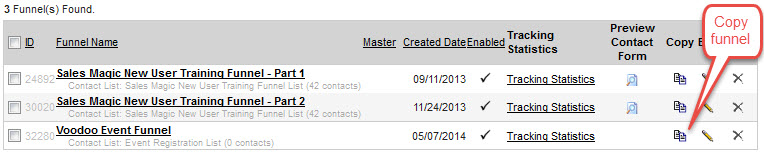
One thing to keep in mind when copying funnels: you should always create a new Event Registration List for your new funnel.  Also, your new funnel will have a new and different capture form URL you will need to copy into your new Initial Invitation as a link to the registration form.

Business Builder, Email Templates & Image Library, New Feature, Sales Funnels & Auto Scheduler , , ,

Importing Contacts & Leads from Salesforce

3. June 2014

We are excited to announce that Voodoo now offers Salesforce Integration.  Users can easily access Voodoo's entire toolset from a tab in your Salesforce account.

It’s easy to import Contacts and Leads from Salesforce into Voodoo Contact Lists.  Here’s how.

Initial Setup & Security

To protect your sensitive data, Salesforce CRM requires VoodooViral.com to provide a security token in order to sync.

Reset and obtain your new Salesforce security token:

1.    Login to your Salesforce account.

2.    Select your name in the top right corner and select Setup.

3.    Under My Settings > Personal (or Personal Setup > My Personal Information), select Reset Security Token.

4.    Your Salesforce security token will be e-mailed to you.

5.    Copy the security token from the email.  You will need it in the next step. 


In your Voodoo account…

Step 1: Create a Contact List to receive incoming Leads and/or Contacts from Salesforce. 


1.    Visit My Contacts page, click the + Add a New Contact List button.

2.    In the Contact List Info tab, name your new list, e.g. My Salesforce Leads or My Salesforce Contacts. Click Save.

3.    Click the Contacts tab, and near the bottom left, click the Import from Salesforce button.


Step 2. Enter your Salesforce Account Details and Security Token.


1.    Enter your Salesforce User Name and Password


2.    Paste your Salesforce Security Token into the designated field. 

Note: Ignore any instructions to “add your security token to your password.” Voodoo does this automatically.

Column Mapping & Final Import


Review Voodoo’s automated Column Mapping and Preview of the first 5 contact rows.

Make any desired changes using the pull down menus.


Click Finish. Your Salesforce contacts will now appear in your designated Voodoo Contact List.


If you would like to learn more about enabling this feature on your Voodoo account please contact us.

Business Builder, Contact / Database Lists, Salesforce , ,

Setting Up the Voodoo Email to Salesforce Feature

1. June 2014

We are excited to announce that Voodoo now offers Salesforce Integration.  Users can easily access Voodoo's entire toolset from a tab in your Salesforce account.

Here’s how to automatically log emails you send from Voodoo as activities on Lead, Contact, and/or Opportunity records. Activity History will be updated based on your Email to Salesforce settings in salesforce.com.

Voodoo updates Contact Activity History by automatically blind carbon copying (BCC) your Voodoo emails to your Email to Salesforce address.  Email content then appears updates the corresponding Contacts in your Salesforce account.  (This feature matches Contact email addresses to determine which Contact Records will be updated.)

 Important—For this feature to work properly, you must set up both accounts as follows:


In your Salesforce account:

 
1.   Log into your Salesforce dashboard
 

2.   At the upper right click on Your Name  >  My Settings
 

3.  On the My Settings page, choose Email  >  My Email to Salesforce.
 

Steps 5, 6 and 7 all take place on the resulting page.


4.  Copy the Email to Salesforce address so that you can paste it into your Personal Settings in Voodoo.
 

5.  Enter the "From" email address used in your Voodoo account into the My Acceptable Email Addresses field in Salesforce.  You can enter more than one address by separating them with a comma, for example if you use an alternate email address when sending from Voodoo Sales Funnels.


6.  Select your desired Email Associations. Here you can determine how and where your Voodoo emails update your Salesforce account.  You can select Opportunities, Leads and/or Contacts, depending on how you work.


We DO NOT recommend using the Always Send them to My Unresolved Items option unless you like to make a lot of extra work for yourself!
 

Also beware of the Email me confirmation of association box.
 

Do not check this if you will be sending Voodoo campaigns to large groups of your Salesforce contacts. You will receive a confirmation email each and every time a Voodoo email gets associated with a Salesforce contact.
 

7.  When your settings are as you want them, click Save


In your Voodoo account:
 

Visit your Personal Settings page, select the Salesforce tab, then paste in your Email-to-Salesforce address and click Update.


Note: If your organization has a Salesforce administrator, you may need ask the administrator to enable Email to Salesforce in your company's Force.com Administer settings.

Salesforce Administrator Instructions:
 

1.  Check the Active box. 

2.  We do not recommend checking the Advanced Email Security Settings box. Click Save

At this point, the administrator will have the option to send an email to users indicating that Email to Salesforce is active.


If you would like to learn more about enabling this feature on your Voodoo account please contact us.

Business Builder, Salesforce ,

See Voodoo Feature #289 in Action - Using Customized Videos on Your Website

29. May 2014


In Voodoo Feature #289 we talked about using customized videos from your Voodoo Video Library on your company website.  

This tip highlights some Voodoo customers who have implemented this feature.

The most flexible way to post videos on your company website is to place a small thumbnail image from the video on your website, then link the thumbnail to a Voodoo video.  When visitors click-through, they'll see a full-size version in your company's custom frame.


Partners Technology

Kudos to Partners Technology for leveraging their Voodoo library throughout their company website by using thumbnail images that link to each full-sized video.


Partners Technology

Click image to visit the site.


Telexperts

Telexperts created a video library of all product videos placed under the Resources section of their company website. Website visitors can easily access all product videos in one convenient location.


Telexperts

Click image to visit the site.


Why not use your OWN customized videos to engage visitors and generate more leads from your website?  Here's how:

Voodoo Feature #289 - Using Customized Videos on Your Website

Work with your web designer to create a thumbnail image that is the ideal size for your website/webpage.  Next, link this thumbnail to your video (from your Voodoo video library). Follow these steps to obtain the URL for the video you wish to post:


eVideo Launcher Users: 

1) Login to your eVideo Launcher account and click Start a New Campaign.
2) Your list of campaigns will appear, find the campaign that contains the video you would like to post and click the Preview Email icon to the right.

3) In the preview window for the email, click the link to access the video.
4) Copy the entire link from the URL bar at the top of your web browser window.
Get URL
5) Since the URLs are often long we recommend you use the Google Link Shortener or
any number of other free services to make it short. 
6) Use this URL as the link from your thumbnail image that is displayed on your website.
7)  If you would like to use Voodoo's trackable links to track the link clicks on your website, please click here to read how to post Voodoo links on social media to learn how to set it up.

Voodoo Business Builder Users:

1)  Login and access My Videos.
2)  Click the green play arrow for the video you want to post.


3) Copy the entire link from the URL bar at the top of your web browser window.
Get URL
4) Since the URLs are often long we recommend you use the Google Link Shortener or
any number of other free services to make it short. 
5) Use this URL as the link from your thumbnail image that is displayed on your website.
6)  If you would like to use Voodoo's trackable links to track the link clicks on your website, please click here to read how to post Voodoo links on social media to learn how to set that up.

eVideo Launcher, New Feature, Video Library & Trackable Links, Business Builder ,

Removing a Contact from a Funnel

13. May 2014

Sometimes you may need to remove a Contact from a Funnel.  This contact may be in a Funnel where multiple emails are still scheduled to go out, and you wish to stop them from receiving any of them.  

The best way to remove them from the Funnel is to simply remove them from the contact list associated with the Funnel. We always recommend creating (and with a similar name to the Funnel) a new contact list for each Funnel so you can easily maintain the contacts. So in this case, you can follow these simple steps:

1) Login to your account, and access My Contacts from the left navigation

2) Search for the Contact you would like to remove from the Funnel


3) Find the Contact in the search results and click the pencil to the left to Edit the Contact Record

4) Click on the Contact Lists tab

5) Click on the Contact List that is used for the Funnel to select it and then click the Remove button.

6) Then click Save

The Contact is now removed from the Funnel and will not receive any additional emails in the Funnel. 

Important Note: 

When accessing the Reports and Statistics for the Funnel. Any stats associated with the contact that have been removed will still remain in the Statistics Snapshot. But if you drill down into a stat (i.e. Opens) the contact will not be in the list.

Quick Tip, Sales Funnels & Auto Scheduler, Business Builder , , ,

Enhance Your Email Signature with Voodoo Video

12. May 2014

Nothing matches the power of video to convey information and make customers bite.  So why not take advantage of your powerful video library in Voodoo, and leverage it in other ways? 

An important way to promote your business is through your standard Email Signature - your name, contact information, logo and other links that get added to every email from your standard email app (e.g., Outlook or Apple Mail).  Since email is tool you use everyday in your business, try adding one or more video links to enhance your signature. Take a look at the example below:  


Using Voodoo Videos in Your Email Signature
It's quick and easy. Here is how to obtain the video link addresses (URLs) you will need to add to your signature:

Voodoo Feature #215 - Enhance Your Email Signature with Voodoo Video

Follow these steps to obtain the URL for the video you want linked to your email signature:


eVideo Launcher Users: 
1) Login to your eVideo Launcher account and click Start a New Campaign.
2) Your list of campaigns will appear, find the campaign that contains the video you would like to post and click the Preview Email icon to the right.
3) In the preview window for the email, click the link to access the video.
4) Copy the entire link from the URL bar at the top of your web browser window.
Get URL
5) Since the URLs are often long, we recommend you use the Google Link Shortener or
any number of other free services to make it short. 
6) Use the shortened URL as the link from your email signature (which you set up in your regular email app)
7)  If you would like to use Voodoo's Trackable Links to track Click-Throughs from your email signature or your website, please click here to read how to post Voodoo links on social media to learn how to set it up.

Voodoo Business Builder Users:

1)  Login and access My Videos.
2)  Click the green Video Link play arrow for the video you want to post.

Get Video URL In Campaign Manager
3) Copy the entire link from the URL bar at the top of your web browser window.
Get URL
4) Since the URLs are often long we recommend you use the Google Link Shortener or
any number of other free services to make it short. 
5) Use the shortened URL as the link from your email signature (which you set up in your regular email app)
6)  If you would like to use Voodoo's Trackable Links to track Click-Throughs from your email signature or your website, please click here to read how to post Voodoo links on social media to learn how to set it up.

 
Also, be sure to check our our post on Using Customized Videos on Your Website for another way to use your Voodoo videos.

eVideo Launcher, Quick Tip, Video Library & Trackable Links, Business Builder ,

New Feature - Add to Calendar Functionality on Email Templates

29. April 2014

Voodoo lets you create Trackable Links to any internet content and track exactly who clicks on the links in your email campaigns.

But did you know, you can also upload a file and make it trackable? Upload items not otherwise available on the web such as private whitepapers, reports, other PDF files, audio files and more.  Each file you upload becomes trackable and can generate Automated Action Alerts to notify you about click-throughs in real time.
 
A powerful use of this feature is for Add-to-Calendar links. When contacts sign up for an event, they like being able to click a link or button to add the event to my calendar. That way, they get easy access to event details right in their calendar.  Now you can leverage this functionality for event invitations and confirmations you send from Voodoo.
 
The screen capture below shows how Voodoo customer Trans-West inserts an Add-to-Calendar button on the email confirmation each event attendee receives after they register for an event.

Example of Add to Calendar
 
So Voodoo Business Builder users, let’s find out how to set up one of these links for your next event.
 
Voodoo Feature #399 – Creating an Add-to-Calendar Trackable Link

The three main steps are:

Create an iCalendar (.ics) file and save it to your computercreate a trackable link and insert the trackable link into your email template. 

1) Create an iCalendar (.ics) file:

Every email client is a little different so you may need to access your help documentation.
Here is a link explaining how to create .ics files from Microsoft Outlook.

In Outlook, you create the event in your calendar, forward it, then use Save As to download the .ics file onto your computer.  This is the file you will later upload to make a Trackable Link.


2) Create a Trackable Link:

a) Access Trackable Links from Customize Email icon or the QuickLinks drop down menu on the Dashboard


b) Click Add New Trackable Link

Add New Trackable Link

c) Enter the details for the Trackable Link

Trackable Link Info

  • Enter a Link Name - this is for your reference only
  • Enter Custom Tag Name - this is for your reference only
  • Enter Link URL - Click Upload File and upload the iCal file you saved on your computer
  • Add a Description - this is for your reference only
  • Enter Link Display Text - this is the text that will appear on your email template. 
  • Note - as an alternative to Display Text, you can upload an image to use as a click-through link (i.e. an Add to Calendar button by using the Image icon in the toolbar shown below.)
d) Click Save

3) Insert the Trackable Link into Email Template


1) Access the Email Template

2) Scroll below the email content to the Voodoo options

Insert Trackable Link into Email Template
3) Click the drop down box for the Trackable Link option

4) Select the Link you just created

5) Place your cursor in the email template exactly where you wish to place the link

6) Click the Insert button next to the Trackable Link Option

7) Save your email template.  Be sure to Preview your template and test the link.

Your Add-to-Calendar link is now inserted into your email. 

Voodoo Business Builder users, give it a try right now by logging into your Voodoo account.  And eVideo Launcher users, well...this is yet another reason to upgrade to the full-featured version of Voodoo.

Email Templates & Image Library, New Feature, Video Library & Trackable Links, Business Builder , ,